
Web browser integration is provided by the use of the Xarios Communicator Browser Add-on and provides integration services to enable automatic mute and un mute of call recordings based on a specific web page that the user has open.
Requirements
There are several requirements that need to be met before the Xarios Communicator can be used.
1. Internet Explorer v7 – v10 (32 bit ONLY)
2. The Xarios Call Recorder needs to have the Compliance module enabled on each channel that is been recorded.
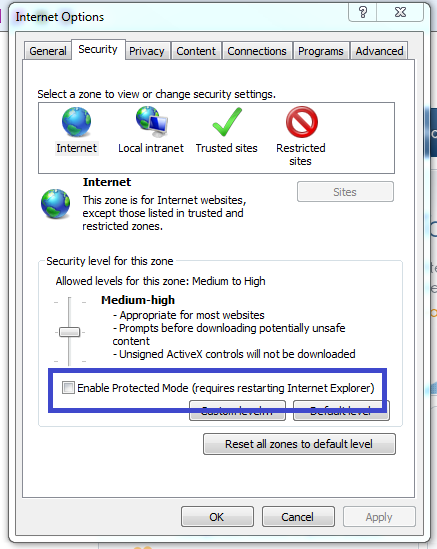
3. Protected Mode needs to be disabled as shown. For any sites where this is enabled for then the add-on will not be able to function. Adding a website to the Trusted Sites generally resolves the issues and this is not enabled for sites in this list.
Installation
The installation and configuration of the add-on needs to be performed for each user. Depending on the IT policies in place, this will determine the most appropriate method for rolling out. The installation is available in the form of a Windows Installer Setup EXE or MSI. The recommended method of installation is shown below:
| Scenario | Installation |
|---|---|
| Manual installation and user has administrative rights | MSI or EXE |
| Manual installation and user does not have administrative rights | EXE with elevated permissions. MSI not supported |
| Active Directory Group Policy | MSI – installed per Computer (See Active Directory & Group Policy Rollouts section) |
The installation only needs to be run once for each computer but configured for each user.
To download the add-on open the link shown below and replace <recorderserver> with the actual DNS or IP Address of the server with the Integration role.
Run the installation file and when this has been installed restart Internet Explorer. The Xarios Communicator Bar will then be available as shown.
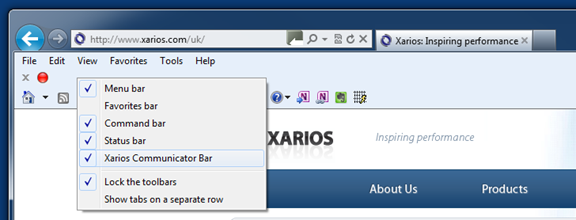
When enabled a new toolbar will be displayed that shows the current status of recording of the active call at the users extensions. When no call is in progress a grey status light will be displayed.

This will turn green when a call is being recorded.

Turn amber when the recording is muted.

If the add-on cannot connect to the server then it will display in red with the reason why it cannot connect.
Client Settings
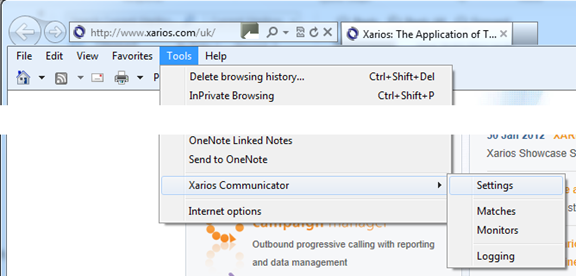
The settings need to be configured that are used to connect to the system. Click on the Tools menu within Microsoft Internet Explorer
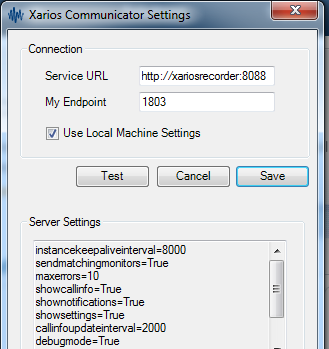
Use Local Machine Settings: If this is set then the settings are configured for ALL users on this computer, otherwise they are for this specific user. If the logged in user does not have the permissions to write to the HKEY_LOCAL_MACHINE registry section then they will not be able to save any settings.
My Endpoint: This is the endpoint number of the extension associated with this user. This setting can also be configured using registry key:
HKEY_CURRENT_USER\Software\Xarios\PhoneClient\Endpoint.
HKEY_LOCAL_MACHINE\Software\Xarios\PhoneClient\Endpoint.
Service URL: This is the URL of the server, contact your administrator for details. This setting can also be configured using registry key:
HKEY_CURRENT_USER\Software\Xarios\PhoneClient\ServiceURL.
HKEY_LOCAL_MACHINE \Software\Xarios\PhoneClient\ServiceURL.
Server Settings: This shows the current settings configured on the Communications Gateway.
Hot Desking
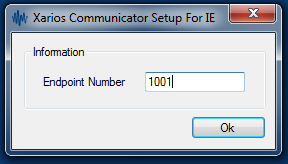
The add-on supports instances when the endpoint number for a specific user changes each time that they log in to the computer. This is via a separate configuration application called Xarios.Communicator.IE.Setup.exe installed into the installation folder of the add-on.
A shortcut can be added to the users start up profile so when they log in, the dialog shown below is displayed. They can then enter their endpoint number and this will be stored against this user.
Active Directory & Group Policy Rollouts
The client can be installed and controlled through the use of Active Directory Group Policy. Installation can be pushed out to all computers and controls can be put in place to prevent the user from disabling the add-on.
Installations can be performed using Active Directory Group Policy and the MSI setup.
The following step by step guide is for a Windows 2008 Domain Controller.
 |
This is only a guide line and the relevant IT administrator should be involved in this process. |
1. Open the Group Policy Management console from the start menu under Administrative Tools.
2. Select the Organizational Unit that contains the computer to roll the client out to.
3. Right click and select Create a GPO in this domain, and Link it here…
4. Give the new GPO a name and click ok, then right click on the new GPO and select Edit.
5. Create a new Package under Computer Configuration -> Policies -> Software Settings -> Software installation.
6. Browse to the MSI installation file. This needs to be in a location referenced by a UNC path that all computers can have access to. For example :\\server1\installs and Authenticated Users need to have permissions to read this folder.
7. Select the Advanced deployment method to open the properties for this installation.
8. The installation can be customized to auto configure the Service URL that the client needs to be connected to. By default this value is http://callrecorder:8080. To change this then an MST transform file can be created. (See http://msdn.microsoft.com/en-gb/library/windows/desktop/aa370557%28v=vs.85%29.aspx for more details). The property SERVICEURL will need to be updated to the correct URL.
9. Once the MST has been created then this can be added from the Modifications tab by clicking Add and browsing to the MST file.
10. Click Ok, when complete.
11. The software will now be rolled out to all computer affected by this GPO. It may take several hours and a reboot on the client computers may be required.
To upgrade an existing installation the same process should be followed with the addition of in the deployment properties, on the upgrade tab the existing package to upgrade should be selected.
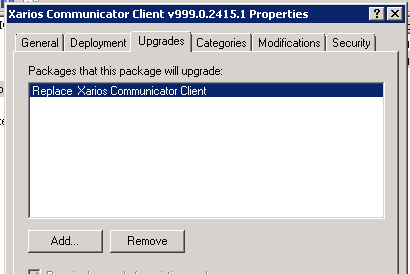
The add-on can be enabled/disabled by the user by default causing the pause/resume to stop working. To prevent this Group Policy settings can be configured. From the Group Policy Management Editor for both the Computer Configuration and the User Configuration enable these options.
Diagnostics
To be able to diagnose any problems, the add-on can have a diagnostic mode enabled. This can be configured on the Client Settings section Debug Mode setting. When this is enabled the extra option will be displayed on the Tools menu,

Selecting Monitors will display a list of the regular expressions that are to be used to find matching URLs.
Selecting Matches display a list of the URLs that are currently open, including any iFrames.
Common Scenarios
Add-on does not load – Check 1
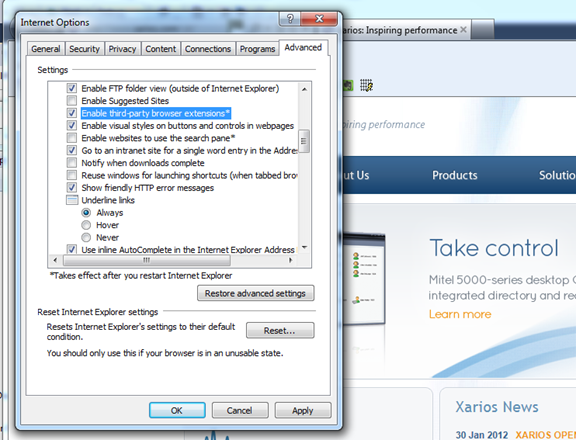
If when Internet Explorer loads the add-on is not available then check that third-party browser extensions are enabled. This can be found from the Tools -> Internet options -> Advanced Tab -> Browsing option section within Internet Explorer.
Add-on does not load – Check 2
If the add-on is not displayed in the Tools -> Manage add-ons section within Internet Explorer then the installation was not run with administrative permissions.

Add-on does not connect
If the add-on loads but does not connect then check that Enable Protected Mode as been disabled for the site that is currently loaded. This can be found from the Tools -> Internet options -> Security tab.
